
14 Ways to Cook Without Using Your Kitchen Stove
Imagine a scenario where a major storm comes through your area and the utility grid is non-functional for days to weeks. Numerous trees are down and blocking the road. It is impossible to make it to a supermarket. In fact, you cannot even make it out of your driveway.
How do you think you would manage?
Some people relish the idea of going off grid. Others would never even think about it. However, when a major storm rolls through your area and cuts off all basic utilities, you are now off grid whether you like it or not.
Learn From My Experience of Cooking Without My Stove
I have experienced such a scenario multiple times in my life. This is because I’ve lived in several areas that are prone to severe weather. But, because I was prepared for such events, being off grid was only a minor inconvenience. Each time it was similar to having a camping trip except for the fact that I was still at home. It was good practice for what I call “camp cooking”.
If you watch the news then you know very well how many times a year this type of situation arises. Each and every time it does, there are thousands of people completely unprepared. They expect someone to come and rescue them instead of taking the initiative to be prepared to manage things themselves. However, if you are adept at camp cooking, have emergency supplies at home, and are prepared to be off grid, such events are simply a minor inconvenience.
In the event of an emergency, you may be without utilities and forced to be off grid for several days, even weeks. Knowing how to prepare meals using something other than your kitchen stove will make the difference between eating a cold meal, a hot one, or maybe nothing at all. Take the time to learn the basics of camp cooking and you will be happy that you did.
14 Methods of Cooking Without Using Your Kitchen Stove
There are several ways to cook meals without using your kitchen stove. Some of these methods require little or no equipment while others will require a small financial investment. Most importantly, whatever method you choose it is in your best interest to master an alternative way of cooking before you actually need it. Better yet, have several alternative means of cooking at your disposal. If you spend time outdoors then campfire cooking is nothing new to you. If it is, then take the time to learn something new.
Here is what you will learn from this post.
Table of Contents
1) COOK OVER AN OPEN FIRE
2) Cook on A WOOD STOVE
3) GRILL IT
4) MAKE A ROCKET STOVE
5) USE A PROPANE STOVE
6) COOK ON A CAMP STOVE
7) BACKPACKING STOVE
8) SOLAR OVEN
9) MAKE A HOT BOX
10) HOME EMERGENCY RADIANT COOKING (HERC)
11) EXPERIMENT WITH A CAMPING OVEN
12) VOLCANO GRILLS ARE SIMPLE AND PORTABLE
13) BUILD AN EARTH OVEN
14) USE CANNED HEAT
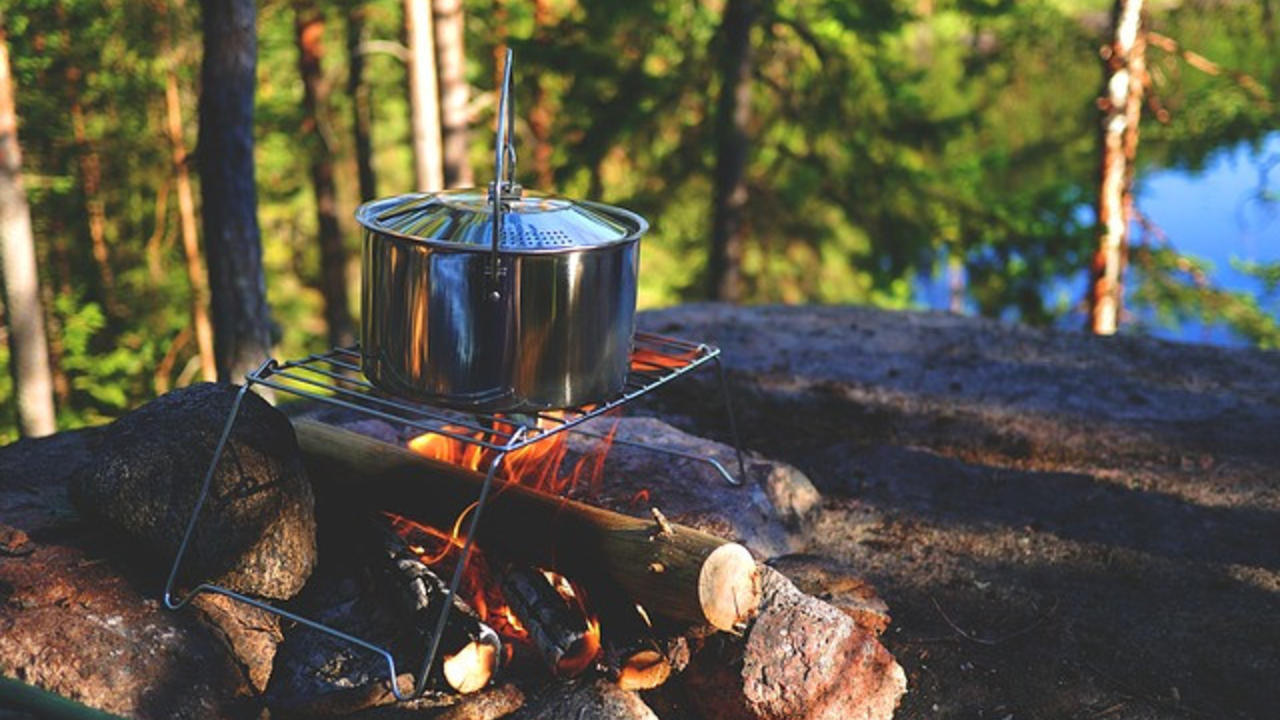
1. Cook over an open fire
For most campers and backpackers, cooking over an open fire is the highlight of the day. If done correctly, food tastes even better than cooking in you kitchen. However, if you are not adept at this skill, it will take some practice. Knowing how to build a cooking fire and using the right utensils makes the job so much easier. In fact, with the right tools, you can cook most anything over an open fire.
Building a Cooking Fire
The location of the fire pit is extremely important. Above all, it is imperative that the fire be built in a protected area. Gusts of wind can easily send sparks flying in the air and start a forest fire. Additionally, the fire should be built on bare ground, free of organic debris. Hard packed soil is best. Ground that contains layers of organic debris will typically be soft when you stand on it. Layers of debris may enable the fire to burn deep into the ground. Therefore, it cannot be put out with just a bucket of water. Place the pit at least 8 feet from any other combustible material with no over hanging branches.
Proper fuel is the next consideration. Dry, well seasoned wood is the best fuel for a fire. It burns clean and hot with minimal smoke and forms slow burning coals. Green or wet wood will burn slow and create a lot of smoke which is not exactly ideal for camp cooking. Not to mention, it is difficult at best to start a fire with either type of wood. If you are out in the forest, low hanging, dead tree branches are often still dry even after a hard rain. Smaller dead standing trees are often easy to topple over and make great fire wood.
Construct the fire pit by doing the following:
- Place rocks in a “U” shape.
- The back of the fire pit should be slightly taller which will somewhat act as a chimney and help to direct smoke up and away.
- The sides should be even in height. It is easier to use rocks with flat tops but this is not necessary. These rocks will support a grate which will be your cooking surface. Keep the grate level to ensure even distribution of heat on the cookware. This helps to ensure successful campfire cooking
- Leave the front of the fire pit open. This is the side facing toward you. This encourages air to flow into the fire pit and will also allow access to the bed of coals to spread them evenly.
Start the fire:
- Place kindling in the bottom of the fire pit. This can be crumpled newspaper, small dry twigs, bundles of dry grass, or anything else that will easily ignite with one match. It may help to initially place the kindling closer to one side.
- Place slightly larger twigs over the kindling. The rocks on one side of the pit can be used to help support these twigs.
- Light the kindling. As soon as it is burning well with some good flames, start adding slightly larger pieces of wood. Larger pieces of wood burn better is they are split.
- Once you have a good flame, add more firewood. It helps to use wood of similar size. They will burn down at roughly the same rate and form a good bed of coals.
- Once the flames die down into a bed of coals, bank some of the coals higher in the back of the pit. This will produce a heat gradient. You can essentially achieve an area of ‘high’, ‘medium’, and ‘low’. You can also evenly distribute the coals and simply move the cookware more to the edge of the pit for a lower level of heat.
Tips for Campfire Cooking
- Practice, practice
Just like any other skill, camp cooking takes practice. Keep a good stack of kindling and dry, seasoned wood around just so you can practice cooking over a fire. The next time your skills are put to the test by being off grid without a choice, you will not be the least bit intimidated.
If you have a place of your own, I would suggest setting up a permanent fire pit. I’ve had one for many years and it gets used on a regular basis.
- Be prepared
If it is possible, perform as much food preparation before stating the fire. Chop vegetables, marinade meat, mix sauces, prepare baking mixes.
- Have plenty of clean water.
This is important in case you need to add water to a dish. It can also be used for clean up. Be sure to have at least a 5 gallon bucket of non-potable water as a safety measure in the event the fire gets out of hand.
- Add wood a little at a time.
It is tempting to add lots of wood all at once. This builds a great bonfire, which burns down quickly. However, this will leave a bed of coals that is so hot you cannot stand close to it much less actually cook over it. Be patient. Add wood little by little. It will take a new fire about 30 to 45 minutes to have coals sufficient for camp cooking.
- Do not cook directly over the flame.

This is okay if you are trying to boil water. Cooking over the flame will also blacken the bottom of your pots very quickly. At any rate, a direct flame produces intense heat. It will cause uneven, rapid cooking of any food. Slow steady heat is far better for campfire cooking.
- Remove food from the heat source (fire) a few minutes before you think it finished cooking.
Any food will continue to cook to some degree after it is removed from the heat source. This is especially true for thick cuts of meat, pots of food, items in a dutch oven, or foods that are wrapped. Both the food and the containers it is cooked in will retain heat. This retained heat continues to cook the food even after it is removed from the heat source. Foods should be removed from heat and allowed to “rest”, which is the equivalent of allowing it to cool for several minutes. Meats should be covered for several minutes. Provided the meat has not been over cooked, cooling the meat will help to retain the juices and will result in a much better taste.
- Choose your cooking method
There are plenty of alternatives for campfire cooking. For example, a skewer, Dutch oven, metal grill grate, hanging pots, and metal grilling baskets. The cooking method varies according to the type of food.
- Know what foods NOT to cook.
With campfire cooking, in general it is best to avoid foods that produce and drip a lot of grease. Bacon is a good example. Also, frying foods produces a lot of splatter and should be avoided if possible. Dripping and splattering of oil causes flare up of the fire. Additionally, if the pan tipped over accidentally the oil would produce a significant fire hazard.
- Construct a permanent fire pit
Cooking over an open fire with a temporary location is simple and easy. That is why it is a valuable skill for an emergency situation and for being off grid. However, with a permanent fire pit, campfire cooking and off grid cooking becomes an art. You can really cook in style. You can think of this as an outdoor wood burning grill. I have a permanent fire pit set up for either cooking or just enjoying a nice bonfire.
Best Tools for Off Grid and Campfire Cooking
For anything you do, having the right tools and equipment will always make the job so much easier and enjoyable. Similarly, the same is true for campfire cooking. There are some basic necessities as well as fun accessories that will make the experience much more enjoyable.
Basic necessities
1) Fuel source, aka wood.

It may sound silly to mention this, but seasoned (dry) wood is needed to build a good cooking fire. Furthermore, the type of wood that is used does make a difference. Finally, the type of wood used for campfire cooking will impart a taste to the food. Therefore it is important to choose carefully.
Hardwoods, such as cherry or oak, are best. They will burn hotter and cleaner. Sappy wood, such as pine, will tend to leave an unpleasant taste to the food. However, on a camping trip, or in a survival situation, you may not have a choice. If you have to use pine or some other wood that contains a lot of sap, find the driest wood possible.
2) Cooking grate

This is essential for placing pots and pans over the fire or simply grilling over the fire. It is best to have the grate as level as possible for even heat distribution. This will also ensure that the food cooks evenly. It will help if you place several rocks of even height on both sides of the fire or use several green logs of equal diameter.
3) Heavy fire proof gloves
Welding gloves work great for this. They are thick and fire proof. Fireplace gloves make a second good choice. These types of gloves add a greater measure of safety when adding wood to the fire, moving coals around, or removing food items from the grill.
4) Shovel
A shovel is a great fireproof tool. Use it for moving coals around and for digging a fire pit. A great portable shovel is the entrenching shovel used by the military. It is a compact folding shovel.
5) Axe and bow saw
An axe or a hatchet is essential for cutting and splitting wood. Maintaining the proper cooking temperature of your fire is dependent on adding the right size of fuel. The bow saw is great for cutting lengths of wood into shorter pieces. The hatchet or axe is used to split wood into smaller diameters for even burning.
6) Tongs and other Utensils

It is better to have longer utensils, at least 18 to 20 inches. Tongs, spatulas, and other utensils can be purchased in “grill sets” at most home improvement stores.
7) Pots and pans
Light weight non-stick frying pans are great for cooking delicate items. Enamel ware (ceramic coated steel cookware) is light weight durable and easy to clean. It is also very versatile. It can be used over the fire, on the wood stove, on the gas stove. This is great stuff and I highly recommend it. Make sure to use pots and pans with lids. The lid helps to retain heat in the pot, which results in the food heating up and cooking much more efficiently.
8) Cast iron cookware, Dutch oven

Cast iron cookware is heavy, durable, and will last a lifetime. It is very versatile and can even be placed directly in the fire. I love it because it has great heat retention and will keep food warm for up to half an hour.
9) Coffeepot and kettle
Great for making coffee or just boiling water.
Awesome accessories for campfire fire cooking
1) Telescoping roasting sticks
These are much more compact and easier to store than the model that has a fixed length. Whenever you find your self cooking off grid, you will relish this simple tool.
2) Cast iron waffle maker
These fun little things have a very long steel and wooden handle to keep your fingers away from the fire.
3) Cast iron griddle
This versatile piece of cookware is suitable to use over the fire, on the wood stove, or on a regular stove top. It is great for cooking eggs, bacon, sausage, hash browns, or anything else you can imagine. In my opinion, this is a necessity for campfire cooking.
4) Steel baskets

These come in various sizes and shapes. Frying pan shaped baskets are great for cooking vegetables over a fire. Flat baskets are great to cook fish or anything else chopped into smaller pieces. Caged baskets, which have a top and bottom that are closed on the food, are great for grilling sandwiches.
5) Hotdog and brat cookers
These come in a shape designed to nest hotdogs and brats. They are made of cast iron and are very durable.
6) Corn grilling baskets/racks
These grilling baskets are specifically designed to hold ears of corn. Load the ears of corn and place them directly on the grill or over the fire.
7) Popcorn poppers
Most models cook up to two quarts of popcorn. They feature nice long handles to prevent you from burning your fingers.
8) Portable steel grills and grates
Get a sturdy model that is going to hold heavy pots and pans. Fixed legs on the grate will make your life easier. However, there are models that are staked into the ground and have several adjustable shelves.
2. Cook on a Wood Stove
If you have a wood stove and use it regularly, you should take advantage of that source of heat. My wood stove is my primary source of heat about 7 months out of the year. Consequently, I use it for cooking on a regular basis. I even bake on top of the stove. One year, just for an experiment, I cooked the entire Thanksgiving dinner on top of the wood stove, turkey included. It may take a little practice but it is well worth the effort.

Since I live off grid and at high altitude, having a wood stove for heat is imperative. However, if you live on grid and in a cooler climate, you should have a back up heat source in the event the grid goes down. A wood stove is the perfect choice.
When most people envision cooking with a wood stove, they think of the older models that have several burners (or hot plates), an oven and a warmer above the top of the stove. These are very large, very heavy stoves. Even though they are fantastic stoves, they are not very practical if you are living off grid full time.
What Is the Best Wood Stove for Cooking?
Old fashioned wood cook stoves are equipped with small hot boxes. The hot box is where the fire is built. This means you can only add small pieces of wood at a time, which burns quickly. Consequently, the fire requires regular attention because it burns out quickly. Consequently, you are never going to have a good bed of coals to work with the next morning.
In my opinion, the wood stove designed for heating a home is a superior stove for cooking purposes. Much larger pieces of wood are use because of the large hot box. After burning down, they leave a nice bed of coals hours later. If you use a stove with a large surface area on top, you easily have room for large pots and pans. You also will end up with a nice heat gradient. Essentially you end up with areas on the stove top that serve as “Hi”, “Med” and “Low”. For example, if your fire box is longer than it is wide, you can build the fire toward the back. This produces a nice heat gradient from front to back.
For baking purposes, I use a Dutch oven on top of the stove. I have also cooked plenty of whole chickens and turkeys by placing them in the traditional roaster and then on top of the wood stove. Smaller Dutch ovens are great for putting inside the fire box. I simply push the coals toward the back and then maintain a fire in the back of the firebox. I rotate the Dutch oven regularly to ensure even cooking. This method makes tasty baked potatoes!!
Cookware that is suitable for the open fire is also suitable for on the wood stove. But, my favorite is cast iron and enamel ware.
In all fairness, I should point out that the modern versions of wood cookstoves are very attractive and more versatile than their older counter parts. However, they are expensive, ranging from $2500 to over $4000 USD. I have a wood stove in each cabin that I use for cooking in the winter. They were both free from people that “just wanted to get rid of them”. At any rate, a good wood stove is a great means of cooking off grid and is a much easier way to prepare food than campfire cooking.
3. Use a Grill

Having a BBQ grill has saved me on several occasions. Because I have traveled a lot for work in the past, I’ve lived in several areas that are prone to severe weather. I’ve been evacuated three times due to hurricanes. Additionally, I lived through an ice storm and had no electricity for 7 days in the middle of winter. Consequently, I’ve leaned to be prepared. Because I love to grill, I always cart around my portable gas grill with extra fuel. Even after an evacuation, I never missed a nice hot meal. Although my preference is a gas grill, a standard charcoal grill is another great option.
Needless to say, having a grill is an easy option for cooking especially if you are off grid, by choice or not!! Most grills are not very portable. For this reason they may not be the best alternative for camp cooking unless you are traveling by vehicle. However, due to the RV and tiny home movement, there are now a lot more choices for portable grills. Take advantage of this.
4. Rocket Stove

Rocket stoves are an amazing heat machine. You can use them for cooking, baking, and even heating a house. They can be a simple portable model or something large enough to need a permanent location. These stoves can be used in multiple different ways. Hence, the choice is up to you.
Due to the design of this stove, the combustion system is efficient, which is the reason they produce so much heat. Rocket stoves are open in the front area where the wood is fed in. This design feeds plenty of oxygen to the fire. The resulting flow of air sucks the flames into the burn tunnel and the resulting “roar” is what gives this stove its name.
Advantages of a rocket stove:
- Highly efficient and clean burning due to complete combustion
- Can reach very high temperatures
- Built from common and easily available materials
- Reach very high temperatures
- Uses wood efficiently. Typically uses wood too small for a wood stove
- Produces little pollution, environmentally friendly
- Portable stoves make a great survival tool and alternative means of cooking.
Disadvantages of a rocket stove:
- The fire requires frequent attention because you are using small pieces of wood.
- Needs frequent cleaning
- Can get extremely hot very quickly
Rockets stoves are quite versatile and come in various sizes. You can easily build one at home or purchase an inexpensive model online for under $100. They are well worth the investment and make a great addition to the homestead.
Home Esthetics has a great post on building different types of rockets stoves. Read their post here.
5. Propane Stove

This makes a great off grid method for cooking. Propane stoves come in a variety of sizes and models depending on your preference. While some versions are complete with 4 burners and an oven others are simple four burner counter top models. Additionally, there are single or double burners which are much more portable. Most importantly, ll of these connect to standard propane tanks with regulators or can be fitted with adaptors. Whatever you choose, this is a clean, reliable source of cooking.
Since my cabins run off of solar electricity, I use a solid fuel source for cooking, which is propane. I have a small four burner stove with an oven in the log cabin. The new cabin has a counter top four burner model. I also use propane for grilling and smoking meat. Because my propane stoves are so efficient, at any point in time I have enough propane onsite to last me at least 2 years. Consequently, this method of cooking serves as a great back up if you are not presently off grid.
6. Camping Stove

A camping stove is pretty much standard equipment for anyone that camps on a regular basis. Camping stoves come in many different models and are a great back up for campfire cooking. Many models have a built in fuel tank which is filled with white gas and pressurized with a hand pump. Others models use small portable propane tanks. My personal preference is a stove that requires a liquid fuel. I do not like purchasing small propane bottles. These bottle are disposable and using them is wasteful. I’ve had the same two burner Coleman camp stove for over 20 years and it still works well.
7. Backpacking Stove

Typically backpacking stoves are single burners. They are light weight, compact and easily portable of course. This is fantastic if you have to move from one location to another. However, you can only cook one pot meals.
8. Solar Oven
Solar ovens are a reliable means of cooking a huge variety of foods. They only require the energy of the sun. They are easy and inexpensive to build or you can purchase one for a couple of hundred dollars. You can find many versions online for a DIY solar oven.
You can make an inexpensive solar oven out of a card board box if you choose. But, that is not going to be very durable. I would advised taking the time and effort to build something that is going to last.
The disadvantage to a solar oven is that they take a lot longer to cook most foods. The exception to this is using a solar oven constructed from recycled solar hot water tubes. These ovens have a small cooking chamber and get very hot very quickly.
Here are a couple of links to articles on building solar cookers:
How to Make a Solar Cooker here.
William Becker published a very detailed article on solar cookers. Find his articlehere.
9. Hot Box
You will hear several different terms used for this type of cooking. For example, Wonder Oven, Wonder Box, Hot Box, Hay Box. By whatever the name, the essentials are basically the same.
The basic idea is to build an insulated box. This can be as simple as a small card board box placed inside a larger card board box with insulation between the two layers. However, if you want something more sturdy, construct wooden box or use a large cooler. But, the basic idea is that you need a well insulated container as a starting point.
This insulated box needs to be large enough to provide several inches of clearance around all sides of whatever food container you use. This extra space is for the insulation. The insulation material can be almost anything, i.e, newspaper, books, blankets, towels, hay or straw (hay box). Efficiency is maximized by completely surrounding the food container with insulation.
The next step is to place the food in a pot and bring the entire contents to a boil. Turn off the heat and place a tightly fitting lid on the pot. Immediately place this inside the hot box, cover the top with insulation, close it up and let it sit all day. The heat retained inside the cooking container will slow cook the food. If insulated correctly, the box will hold usable heat for up to eight hours.
For better results, I would recommend using a pot that will retain heat for a long period of time. My preference is to use a cast iron Dutch oven. Cast iron may take longer to heat up but it also retains heat much longer than most other cooking pots. Cooking times are going to vary greatly. It all depends on the type of food you are cooking and the amount of boiling time prior to placing the food in the box.
For a little more information, Mother Earth News has a great article on hay box cooking. This is an older article but it is a good one all the same. Read it here.
10. HERC (Home Emergency Radiant Cooking)
HERC is also known as a Tea Light Oven. It uses a series of candles to produce radiant heat. You can cook almost anything in this oven. The candles are inexpensive, the oven is light weight and easy to store.
Here is a great article by Prepared Housewives.
11. Camping Oven
This is another cooking option in case the grid goes down. Because there are several different models of camping ovens you have some versitility . Some are simply a collapsible metal box with a built in temperature gauge. For exam, the Coleman camp oven. They just need to be placed on a heat source such as an open fire, a wood stove, or propane burner. Other camp stoves look similar to a standard oven and are powered by propane. They are well insulated and consequently are very efficient. The limitation is their small size.
You can find a variety of camping ovens on Find Similar.
12. Volcano Grill
This grill is compact, versatile, and gives you the option of using either wood, propane or charcoal as a heat sources. Rather than depending on only one thing, this grill provides a lot of versatility.
Check it out on volcanogrills.com
13. Earth Oven
The earth oven design has been around for eons. It is great for cooking pizzas, breads, or baking just about anything you can imagine. They are not difficult to build and are generally heated by wood. Keep in mind that these are permanent structures.
Mother Earth News have a great article on Build Your Own Wood-Fired Earth Oven.
14. Canned Heat
There are numerous products on the market. However, Sterno brand canned heat is one of the most popular. Canned heat is simply a solid fuel source in a can. Take the lid off and light it with a match. Once you are finished cooking, put the lid back on to extinguish the flame.
The nature of this product makes it highly portable and efficient. Although this is an easy cooking option, I would use it only as a last resort in an emergency situation. Think of it as a limited resource because once it is gone there is no way to cook additional food. Consequently, what I do is keep some on hand to be used if all else fails. It is sort of a back up for the back.
Additional Posts of Interest
I hope you have enjoyed this post. It is a lot of information. However, the tools presented here can serve you well in an emergency. Finally, here are some additional posts that may be of interest.
The Ten Essentials Needed for Survival
How to Maintain a Safe Water Supply
Go off grid and live well,
Patrick
Stay connected with us to receive regular updates.
Join our mailing list to receive the latest news and updates from our team. We always respect your privacy. Your information will never be shared.
Patrick

Sustainable Living Expert
Author
Having grown up with 2 working farms in the family, I was active outside from a young age. I have lived off the grid for over 20 years and still going strong. I would love to teach you the skills of sustainable living and all else that is needed for you to be secure in managing your own resources.
Get regular updates and exciting new articles.

